由于需要更换了MacBook Air的SSD(256G), 换上了2T的SSD,现在记录下必要的环境安装和设置,万一以后还换苹果电脑呢?😂😂😂
1. HomeBrew
直接使用官网明令安装,提示如下:
1
2
3
bill@192 ~ % /bin/bash -c "$(curl -fsSL https://raw.githubusercontent.com/Homebrew/install/HEAD/install.sh)"

curl: (7) Failed to connect to raw.githubusercontent.com port 443 after 23 ms: Connection refused
查看网上解决办法,可以设置端口号和本地的科学上网端号对应:
1
export https_proxy=http://127.0.0.1:8001 http_proxy=http://127.0.0.1:8001 all_proxy=socks5://127.0.0.1:1080
再次下载就没有问题了
1
2
3
4
5
6
7
8
9
10
11
12
13
14
15
16
17
18
19
20
21
22
23
24
25
26
27
28
29
30
31
32
33
34
35
36
37
38
39
40
41
42
43
44
45
==> Checking for `sudo` access (which may request your password)...
Password:
==> This script will install:
/usr/local/bin/brew
/usr/local/share/doc/homebrew
/usr/local/share/man/man1/brew.1
/usr/local/share/zsh/site-functions/_brew
/usr/local/etc/bash_completion.d/brew
/usr/local/Homebrew
==> The following new directories will be created:
/usr/local/include
/usr/local/sbin
/usr/local/opt
/usr/local/var/homebrew/linked
/usr/local/Cellar
/usr/local/Caskroom
/usr/local/Frameworks

Press RETURN/ENTER to continue or any other key to abort:
==> /usr/bin/sudo /bin/mkdir -p /usr/local/include /usr/local/sbin /usr/local/opt /usr/local/var/homebrew/linked /usr/local/Cellar /usr/local/Caskroom /usr/local/Frameworks
==> /usr/bin/sudo /bin/chmod ug=rwx /usr/local/include /usr/local/sbin /usr/local/opt /usr/local/var/homebrew/linked /usr/local/Cellar /usr/local/Caskroom /usr/local/Frameworks
==> /usr/bin/sudo /usr/sbin/chown bill /usr/local/include /usr/local/sbin /usr/local/opt /usr/local/var/homebrew/linked /usr/local/Cellar /usr/local/Caskroom /usr/local/Frameworks
==> /usr/bin/sudo /usr/bin/chgrp admin /usr/local/include /usr/local/sbin /usr/local/opt /usr/local/var/homebrew/linked /usr/local/Cellar /usr/local/Caskroom /usr/local/Frameworks
==> /usr/bin/sudo /usr/sbin/chown -R bill:admin /usr/local/Homebrew
==> /usr/bin/sudo /bin/mkdir -p /Users/bill/Library/Caches/Homebrew
==> /usr/bin/sudo /bin/chmod g+rwx /Users/bill/Library/Caches/Homebrew
==> /usr/bin/sudo /usr/sbin/chown -R bill /Users/bill/Library/Caches/Homebrew
==> Downloading and installing Homebrew...
Updating files: 100% (2760/2760), done.
HEAD is now at 33709297c Merge pull request #13078 from Homebrew/dependabot/bundler/Library/Homebrew/rspec-mocks-3.11.1
fatal: Could not resolve HEAD to a revision
==> Installation successful!

==> Homebrew has enabled anonymous aggregate formulae and cask analytics.
Read the analytics documentation (and how to opt-out) here:
  https://docs.brew.sh/Analytics
No analytics data has been sent yet (nor will any be during this install run).

==> Homebrew is run entirely by unpaid volunteers. Please consider donating:
  https://github.com/Homebrew/brew#donations

==> Next steps:
- Run brew help to get started
- Further documentation:
    https://docs.brew.sh
2. Git
2.1 Git安装
使用brew search git无法找到对应的包:
1
2
3
4
5
==> Casks
adobe-digital-editions   gitahead                 giteye                   github                   gitnote                  gitup                    plotdigitizer            subgit
deepgit                  gitblade                 gitfiend                 githubpulse              gitpigeon                gitx                     rowanj-gitx              webplotdigitizer
digital                  gitdock                  gitfinder                gitify                   gitscout                 lego-digital-designer    smartgit
git-it                   gitee                    gitfox                   gitkraken                gitter                   logitech-presentation    snagit
直接安装git也提示无法安装:
1
2
3
4
5
6
7
8
brew install git
Warning: No available formula with the name "git".
==> Searching for similarly named formulae...
Error: No similarly named formulae found.
==> Searching for a previously deleted formula (in the last month)...
Error: No previously deleted formula found.
==> Searching taps on GitHub...
Error: No formulae found in taps.
执行如下命令后可正常下载:
1
2
bill@192 ~ % rm -rf /usr/local/Homebrew/Library/Taps/homebrew/homebrew-core
bill@192 ~ % brew update
2.2 git alias
修改~/.gitconfig
1
2
3
4
5
6
7
8
9
10
11
12
13
14
15
16
17
18
19
20
21
22
23
24
25
26
27
28
[alias]
  co = checkout
  cob = checkout -b
  coo = !git fetch && git checkout
  br = branch
  brd = branch -d
  st = status
  aa = add -A .
  unstage = reset --soft HEAD^
  cm = commit -m
  ci = commit
  amend = commit --amend -m
  fix = commit --fixup
  undo = reset HEAD~1
  rv = revert
  cp = cherry-pick
  pu = !git push origin `git branch --show-current`
  fush = push -f
  mg = merge --no-ff
  rb = rebase
  rbc = rebase --continue
  rba = rebase --abort
  rbs = rebase --skip
  rom = !git fetch && git rebase -i origin/master --autosquash
  save = stash push
  pop = stash pop
  apply = stash apply
  rl = reflog
2.3 .gitignore
.DS_Store是MacOs的配置隐藏文件,配置.gitignore忽略该文件
1
.DS_Store
3. zsh
忽略大小写, 在.zshrc配置:
1
2
autoload -Uz compinit && compinit
zstyle ':completion:*' matcher-list 'm:{[:lower:][:upper:]}={[:upper:][:lower:]}' 'm:{[:lower:][:upper:]}={[:upper:][:lower:]} l:|=* r:|=*' 'm:{[:lower:][:upper:]}={[:upper:][:lower:]} l:|=* r:|=*' 'm:{[:lower:][:upper:]}={[:upper:][:lower:]} l:|=* r:|=*'
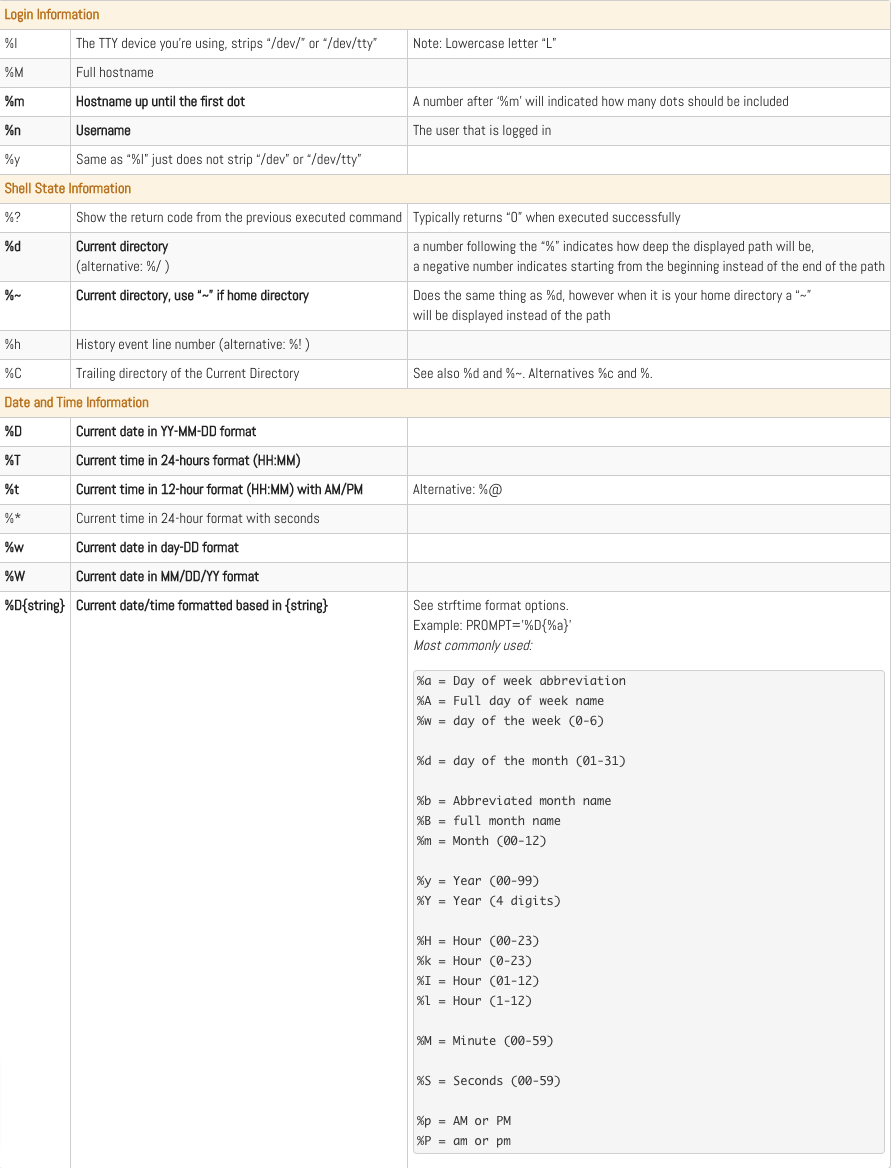
设置终端PROMPT:
1
export PROMPT='%n@MacBook %B%~%b $ '
效果图如下:

具体的ZSH的PROMPT配置如下,或参考网址https://www.tweaking4all.com/software/macosx-software/customize-zsh-prompt/
4. Bash
有时候编译时,需要切换回bash来操作,此时可以通过$SHELL命令来看当前的shell。可以通过如下命令进行bash和zsh的切换:
1
2
3
4
# 切换至bash
chsh -s /bin/bash
# 切换至zsh
chsh -s /bin/zsh
bash的prompt配置可以如下,效果和zsh类似:
1
export PS1="\u@MacBook\w $ "
具体配置可参考:
1
2
3
4
5
6
7
\d – Current date
\t – Current time
\h – Host name
\# – Command number
\u – User name
\W – Current working directory (ie: Desktop/)
\w – Current working directory with full path (ie: /Users/Admin/Desktop/)
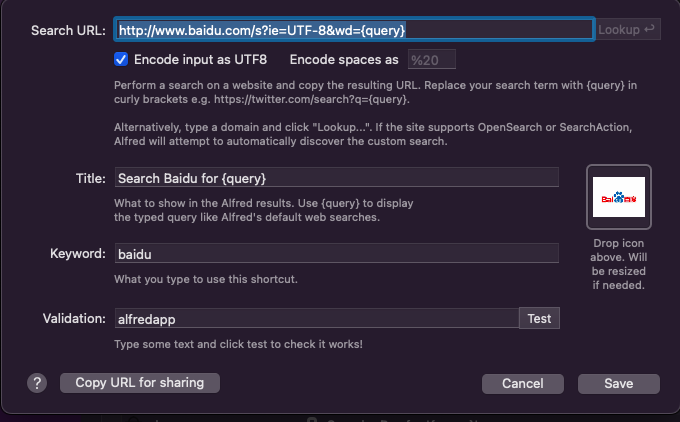
5. Alfred
增加几个常用的搜索引擎
1
2
3
4
https://www.zhihu.com/search?q={query}
https://s.weibo.com/weibo?q={query}
https://search.bilibili.com/all?keyword={query}
http://www.baidu.com/s?ie=UTF-8&wd={query}
6. 搜索工具
6.1 ripgrep
1
brew install ripgrep
7. 编程环境
7.1 GO安装
1
brew install go
7.2 Python安装
1
brew install python
配置Python3的.zshrc环境变量:
1
2
3
4
PYTHON_HOME="/usr/local/Cellar/python@3.9/3.9.12/bin/"
export PATH="${PATH}:${PYTHON_HOME}"
alias python="${PYTHON_HOME}/python3"
alias pip="${PYTHON_HOME}/pip3"
8. 快捷键设置
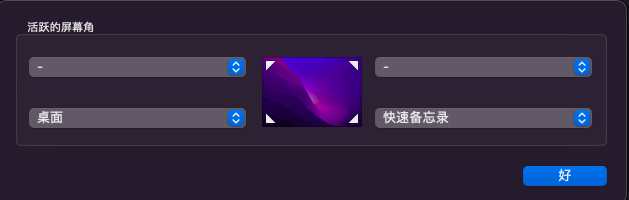
8.1 快速回到桌面
左上角点击🍎->系统偏好->调度中心->触发角
8.2 快速截屏
1
command + shift + 5
9. ITERM配置
先下载ITerm2,网址是https://iterm2.com/。然后下载主题配置,如下:
1
git clone https://github.com/mbadolato/iTerm2-Color-Schemes
主题配置如下:
1
2
3
4
5
6
7
8
9
10
Via iTerm preferences (go to the same configuration location as above):

Launch iTerm 2. Get the latest version at iterm2.com
Click on iTerm2 menu title
Select Preferences... option
Select Profiles
Navigate to Colors tab
Click on Color Presets
Click on Import
Select the .itermcolors file(s) of the schemes you'd like to use * Click on Color Presets and choose a color scheme